Tips for Removing Insulation Safely

Whether you need to replace old insulation or are building a new home, the proper type of insulation will make a difference in your indoor air quality. However, you need to know how to remove existing insulation safely before you do so.

Older insulation can be contaminated with mold and mildew, which is dangerous when inhaled. This article will help you take care of the task safely and efficiently. Visit Website to learn more.

insulation removal

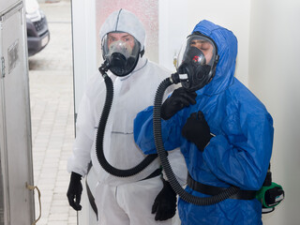
Removing insulation can be a messy and dangerous DIY project if not done properly. It’s important to follow all necessary safety protocols to avoid exposing yourself and your family to harmful fiberglass particles and combustible materials. 

It’s essential to prepare the area where you will be working before removing insulation. The best way to do this is to clear a path from your attic access door to the rest of your home, covering the walls and floor along that pathway with plastic tarps or sheets. This will prevent fiberglass particles from spreading to other areas of your home or building as you work.

In addition to protecting your home, this step will make the removal process much less messy. Once you’ve cleared the area, wear your protective gear and prepare to begin the process by setting up a ladder for reaching the attic and equipping it with a broom and dustpan for clearing small debris and sucking blown-in insulation into a vacuum bag or garbage can for disposal.

Another crucial step is to turn off and disconnect any power sources in the attic or other room where you will be working. This will minimize the risk of electrical hazards and fires, and it will also ensure that utility providers are notified that the insulation will be disturbed.

Finally, it’s a good idea to test the insulation for asbestos before beginning the removal process. Most old insulation is contaminated with asbestos, and it’s important to take the time to remove it properly if you suspect that it’s present.

If you have doubts about the type of insulation in your attic, it’s a good idea to hire a professional to conduct an inspection and testing before attempting to remove it. While this may cost more than DIY options, it will ensure the safety of your family and help you avoid costly and hazardous mistakes. A professional will also know the proper ways to dispose of asbestos, reducing the risk of contamination throughout your home and surrounding environment.

Insulation is an important component of any home, especially in attics. It improves the energy efficiency of a house and helps to protect its inhabitants from rodents, mold, and more. However, not all insulation is created equal – and removing old insulation can be hazardous to your health. This is why it’s crucial to use the right tools and safety precautions.

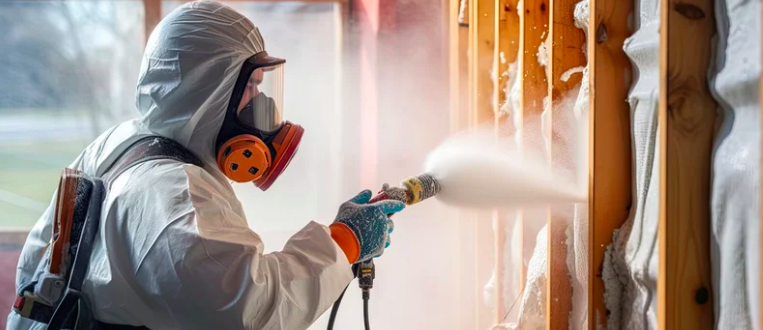
The most important aspect of preparing to remove insulation is putting on protective gear, including gloves, a dust mask, and eye protection. This will help to avoid skin and eye irritation caused by fiberglass particles, as well as prevent any toxins from being inhaled by the wearer. It’s also a good idea to wear long sleeves and pants, in addition to a helmet and hard hat.

If you’re removing cellulose or loose-fill fiberglass insulation, it’s recommended that you spread plastic over any items in the living spaces below the attic to avoid any contamination. This will also help to save you from having to clean up a mess later on if the blown-in insulation falls during the removal process and contaminates your possessions below.

It’s best to hire a professional if you plan on attempting blown-in insulation removal, as they will have the proper equipment for the job. This will include a vacuum system that can suck up the insulation and an industrial hose to do so safely. It’s much better than doing it by hand, which can be dangerous.

Some types of blown-in insulation can be extremely toxic to touch and even inhale. For example, asbestos can be found in vermiculite and mineral wool insulation, and this material is known to cause mesothelioma and other serious health issues. If you’re not sure what kind of insulation you have in your attic or if it could contain any toxins, it’s best to leave the removal process to a professional.

Vacuuming when removing insulation is a very important part of the process. It not only helps to keep the work area clean, but it also protects the person vacuuming from breathing in fiberglass particles that can cause dermatitis and other health issues. Wearing appropriate protective gear and using a vacuum that has a HEPA filter that is specifically designed for this task will help minimize the amount of airborne dust and insulation fibers created.

Before vacuuming the insulation, it is a good idea to remove any furniture or equipment in the attic that may get in the way of getting the job done efficiently. This will make it easier to move around in the attic and ensure that all attic areas are cleaned.

Once the attic is clear, a commercial-grade vacuum with a HEPA filter, metal hose connectors, and large vacuum bags should be set up to begin the work. It is also a good idea to bring a ladder and rakes for use in the attic. This will allow you to collect the old insulation and rake it into waste bags for disposal.

When vacuuming, it is important to go slowly to avoid disturbing the existing insulation and causing damage. It is also a good idea to vacuum all corners and crevices of the attic space to be sure that all areas have been properly cleaned.

If you can do this, removing insulation will be much faster and easier. This will help to save on labor costs and will ensure that the work is completed properly. It is also a good idea to read reviews of the companies that offer this service before deciding. This will provide you with valuable insight into the quality of their work and the customer satisfaction they can offer.

Once the attic has been thoroughly cleaned, it is a good idea to dispose of the old insulation by local regulations. Check with your local waste management and recycling facility to determine how this can be done safely and effectively.

It’s important to ensure the wiring is safe before removing insulation. Old insulation can contain harmful materials, including asbestos. It can also interfere with electrical systems, leading to dangerous conditions like fires and shocks. In addition, the contaminated dust and allergens that come from removing insulation can cause health problems in people with respiratory problems or other medical conditions.

Home inspectors often use their attic to assess the condition of insulation and the wiring in a house. The process can be messy and hazardous, so it’s important to prepare the attic area before beginning work:

  1. Clear a pathway from the attic access door to the exit.
  2. Cover the floor and walls of the attic with plastic sheeting to prevent fiberglass from drifting into the living space below.
  3. Set up a vacuum cleaner that can suck insulation and dispose of it safely.

Identifying the type of insulation in the attic is also critical, as different types require different removal methods. Fiberglass batt insulation, for example, may release particles that are hazardous to breathe. Loose-fill insulation requires special vacuum equipment for removal. Spray foam insulation, on the other hand, may need to be cut manually.

Once the insulation is removed from the attic, the inspector will check the wires and connections to the electrical panel. They will look for rust, damage, and other signs of wear and tear. They will also test the voltage of the line and neutral terminals of the transformer using a multimeter. This is known as megger testing and demonstrates whether or not the insulation is in good condition.

If the results of the megger testing indicate that the wiring is in good shape, the home inspector will continue to inspect the connections and connections throughout the house. This includes checking if light switches are located close to doors and hallways, as well as the number of lights per room. The inspector will also check if the breaker box has a grounding conductor, which reduces the risk of electric shock.

After the inspection, the home inspector will write a report and provide recommendations for improving the insulation in the attic. The report will include a cost estimate and a time frame for when the insulation should be replaced.

How the Spray Foam Insulation Process Works

Spray Foam Insulation Houston helps to protect against the biggest source of energy loss – air leakage – by creating an effective barrier. It also helps to prevent moisture and odors from entering a home.

It’s typically installed in new construction walls after running wires and plumbing, but before drywall is put up. It’s a quick and easy way to improve the energy efficiency of a home.

insulation

1. Preparation

Spray foam insulation is a mixture of two chemicals that expands when sprayed on walls, ceilings and other areas to be insulated. Unlike fiberglass batts or blown-in cellulose insulation, it creates an airtight seal that stops heat transfer between a home’s interior and the outside.

It also works to minimize air leakage, reducing energy costs. It’s the green building material of choice for achieving home energy efficiency goals.

Before the spraying begins, contractors prep the area to be sprayed. If they’re insulating an existing home, this means moving furniture, covering items that can’t be moved and putting up any drapes or curtains to prevent them from getting soaked by the expanding foam. Then the contractors can access all the walls to insulate them. They usually use special slow-expanding foam that allows them to accurately fill the voids in wall cavities without overfilling them.

If they’re insulating an attic, they need to move any items they can’t lift out of the way and cover them with plastic sheets or paint buckets to keep the foam from sticking to anything it comes into contact with. Contractors wear gloves to protect their hands and eyes, and they should avoid direct skin contact with isocyanates (the chemical that causes the reaction) to limit their exposure. They also wear respirators when working with open cell spray polyurethane that contains volatile organic compounds that can cause respiratory irritation.

During the spraying process, the two components of the spray foam come together in the tip of the gun. The “A” side of the system contains isocyanate and a blend of catalysts, while the “B” side contains polyol resin, blowing agent and other ingredients to give it its unique properties and characteristics. The combination of these chemicals is heated, balanced and sprayed through the applicator gun to generate spray foam insulation.

Some companies are starting to transition to low-GWP foams that are less likely to speed up climate change than the hydrofluorocarbons used in conventional spray foams. In the meantime, if you’re thinking about installing spray foam insulation in your home, ask the contractor if they use HFC-free insulation.

2. Spraying

Spray foam insulation is sprayed on to the areas of the home that need insulating. It’s a liquid that expands as it dries, filling all the gaps and nooks and crannies for an effective protective barrier. It’s important that the coat is even and thick enough for best results. If it’s too thin, the thermal protection is weakened. It’s also important to wear a full set of safety gear, including goggles and a respirator. You don’t want to get the foam in your eyes or breathe the fumes!

Foam insulation can be used on walls and ceilings, in new construction or as part of a remodel. For new construction, it’s sprayed in between wall studs after wiring and plumbing are run but before drywall or other interior wall material is put in place. It’s a quick and easy way to insulate the walls and make the house airtight. It’s also good for reducing sound transmission.

For existing homes, closed-cell spray foam is the preferred option because it’s more durable and creates a vapor barrier that helps prevent mold and mildew. It’s also a bit more expensive than open-cell spray foam, but it still offers better insulation per square foot than batts of fiberglass or cotton insulation.

Before starting the process, it’s essential to read and understand the manufacturer’s instructions for applying the spray foam insulation. This will ensure that you’re following the correct application techniques and ensuring that your product performs optimally. It’s also vital to prepare the foam canisters before mixing. Having them at room temperature is necessary to ensure that the chemicals mix properly.

During this phase, it’s important to keep the area you’re working in well-lit. This will help you see what you’re doing and avoid any accidents. It’s also a good idea to cover any stored items in the attic so they don’t get coated with the insulation.

Foam insulation that’s exposed in nonliving areas of a home (like an attic) needs to be covered by an approved thermal barrier. This can be drywall, mineral fiber insulation or specially formulated spray-on coatings.

3. Sealing

The foam expands and fills the space, sealing all nooks and crannies to create an airtight barrier. It also functions as an insulator and vapor barrier, keeping moisture out of the wall and preventing it from absorbing into the wood. It can also be used as a mold inhibitor and a fire retardant.

Spray foam insulation has an R-value of 3.7 to 6.5 per inch, so it’s quite effective at containing heat and reducing the amount of air moving throughout the building envelope and escaping through leaks. Increasing the insulation in your home is one of the three most cost-effective energy-efficiency measures you can take (sealing air leaks and adding mechanical ventilation are the other two).

Depending on the type of spray foam, it may contain a range of chemicals called prepolymers. These are typically a mixture of polyols, catalyst (primarily amines), hydrofluorocarbon or carbon dioxide propellant, surfactants and flame retardants. The ingredients of a particular product are listed on the can.

When contractors mix the components on site, they use a professional rig with a dispensing applicator gun to get an even mix and maintain the right temperature. The mixture is then sprayed onto the wall or other area and immediately begins to react. The resulting chemical reaction is what makes the foam expand and harden so quickly.

The foam has the potential to off-gas a disturbing concoction of volatile organic compounds, including formaldehyde and methylene diphenyl diisocyanate (MDI). Both are endocrine disruptors, carcinogens and bio-accumulative toxicants. The chemicals can irritate the skin, eyes and respiratory system. If exposed long enough, they can even cause chemical sensitivities.

Professional technicians wear personal protective equipment (PPE) when working with insulating foam sealants. It’s generally recommended that homeowners vacate the home during spraying and the curing process. This prevents exposure to the dangerous chemicals and ensures that the job gets done properly. After the foam has fully cured, it is safe to return to the home. It can take anywhere from five to 60 minutes for the sealant to reach a tack free state.

4. Drying

Spray foam insulation is a powerful air sealant that creates a custom barrier around ductwork and other penetrations, protecting them from moisture infiltration. It can also seal soffits and ridge vents, creating an airtight seal that reduces energy costs by limiting the movement of heat between the attic and living space.

The drying phase of the spray foam process can take up to 24 hours or more. This time frame is primarily dependent on the ambient temperature and humidity, which affect how quickly moisture evaporates from the surface of the foam. Raising the ambient temperature and lowering humidity levels can accelerate the curing process, while also helping to minimize the risk of mold or mildew development.

For the best results, installers should carefully monitor the temperature and humidity of the area where the foam is being applied. If the conditions are not ideal, product waste and equipment malfunctions are more likely to occur. This is particularly important during winter, when temperatures can drop for weeks at a time. Spray foam cylinder pressure drops as the temperature dips, and adequate pressure is needed for the spray to perform optimally.

Toxic fumes from the isocyanate-based chemicals in spray foam insulation can pose serious health risks for people exposed to them. It’s vital to follow proper safety procedures during the spraying and curing phases of the process, as well as ensuring that all employees are properly trained and protected.

It’s also important to ensure that any ductwork or other penetrations are completely sealed before applying spray foam, as this will help to prevent unwanted moisture intrusion. Once the insulation is sufficiently dried, it will be safe for use and can significantly reduce a home’s heating and cooling bills. Air leakage accounts for 40 percent of energy costs, and spray foam insulation is one of the few building products that can effectively seal gaps to cut down on energy usage. With this in mind, it’s important to choose a qualified contractor when installing spray foam insulation. They’ll be able to install it correctly and ensure that the insulation is properly cured for maximum effectiveness.